Big Industries Academy

For a recent customer project, I supported a Cronos company so that we could install Apache Cassandra, Apache Spark, and DataStax Spark Cassandra Connector on GNU/Linux servers of the customer, and connect Tableau Desktop for visualization of the results.
Apache Cassandra is a free and open-source distributed database management system designed to handle large amounts of data across many commodity servers, providing high availability with no single point of failure. Cassandra offers robust support for clusters spanning multiple datacenters, with asynchronous masterless replication allowing low latency operations for all clients.
Tableau Desktop is an award-winning data visualization software that lets you see and understand data in minutes. It provides the business user with a state-of-the art user interface and data visualization options to make the best possible case of getting insights from a diverse set of data sources.
In this article, I will show how to:
- Install Apache Cassandra, Apache Spark, and DataStax Cassandra Connector on a GNU/Linux server (a virtual machine in this case),
- Create a simple keyspace and table in Cassandra using CQLSH,
- How to test connectivity from within Spark Shell
- Set up a Spark Thrift server, testing Spark SQL connectivity to Cassandra from within Spark Beeline client,
- And finally demonstrate how to connect Tableau Desktop to Cassandra, via its Spark SQL driver to the Cassandra table we’ve created.
Below you can see the simplified architectural diagram of the system.

Installing Cassandra
The following commands have been tested on an Ubuntu GNU/Linux system, version 14.04.1 LTS in a VirtualBox virtual machine.
Note: Before going further, please ensure that you have Java runtime 8 or higher, and your JAVA_HOME environment is properly set up your GNU/Linux server, e.g.:
$ java -version
java version "1.8.0_25"
Java(TM) SE Runtime Environment (build 1.8.0_25-b17)
Java HotSpot(TM) 64-Bit Server VM (build 25.25-b02, mixed mode)
$ echo $JAVA_HOME
/usr/lib/jvm/java-8-oracle
The simplest way to install Cassandra on an Ubuntu GNU/Linux server is by using the Cassandra .deb package repositories:
$ echo "deb http://www.apache.org/dist/cassandra/debian 39x main" | sudo tee -a /etc/apt/sources.list.d/cassandra.sources.list
$ curl https://www.apache.org/dist/cassandra/KEYS | sudo apt-key add -
sudo apt-get update
$ sudo apt-get install cassandra
$ sudo apt-get install cassandra-tools
Once Cassandra is installed, you can start a single node Cassandra service via:
$ sudo service cassandra start
And check the version and status of Cassandra using the nodetool:
$ nodetool status
Datacenter: datacenter1
=======================
Status=Up/Down
|/ State=Normal/Leaving/Joining/Moving
-- Address Load Tokens Owns (effective) Host ID Rack
UN 127.0.0.1 109.11 KiB 256 100.0% 5fd42e08-86ed-426c-b583-f197000c55b2 rack1
$ nodetool version
ReleaseVersion: 3.9
Now that we have Cassandra up and running, it is time to create a keyspace and a simple table within it, and then add a some data to the table using CQLSH, the Cassandra Query Language SHell:
$ cqlsh
Connected to Test Cluster at 127.0.0.1:9042.
[cqlsh 5.0.1 | Cassandra 3.9 | CQL spec 3.4.2 | Native protocol v4]
Use HELP for help.
cqlsh> CREATE KEYSPACE BigIndustries WITH replication = {'class': 'SimpleStrategy', 'replication_factor': 1 };
cqlsh> CREATE TABLE BigIndustries.SimpleKeyValueTable(key text PRIMARY KEY, value int);
cqlsh> INSERT INTO BigIndustries.SimpleKeyValueTable(key, value) VALUES ('key1', 1);
cqlsh> INSERT INTO BigIndustries.SimpleKeyValueTable(key, value) VALUES ('key2', 2);
cqlsh> SELECT * FROM BigIndustries.SimpleKeyValueTable;
key | value
------+-------
key1 | 1
key2 | 2
(2 rows)
Installing Spark and Cassandra Connector
After having installed Cassandra and stored some data in it, we should first install Apache Spark that comes with Spark Thrift server, which, in turn, will enable Tableau to connect to it, and hence to Cassandra.
Installing the latest version of Apache Spark, 2.1.0 at the time of this writing, can be done by visiting the download page and downloading the tarball, and extracting it to the directory of your choosing, in our case:
$ cd ~/bin
$ wget http://d3kbcqa49mib13.cloudfront.net/spark-2.1.0-bin-hadoop2.7.tgz
$ tar zxvf spark-2.1.0-bin-hadoop2.7.tgz
Now we can install the open source DataStax Spark Cassandra Connector with the help of Spark Shell and test the connection to Cassandra from within the Spark Shell:
$ cd ~/bin/spark-2.1.0-bin-hadoop2.7
$ bin/spark-shell --conf spark.cassandra.connection.host=127.0.0.1 --packages datastax:spark-cassandra-connector:2.0.0-M2-s_2.11
The command above will automatically resolve the relevant Spark Cassandra Connector address, download and place the required JAR files in a suitable location, and then show you the Spark Shell prompt, so that we can test connection to Cassandra:
scala> import com.datastax.spark.connector._
import com.datastax.spark.connector._
scala> val rdd = sc.cassandraTable("bigindustries", "simplekeyvaluetable")
rdd: com.datastax.spark.connector.rdd.CassandraTableScanRDD[com.datastax.spark.connector.CassandraRow] = CassandraTableScanRDD[3] at RDD at CassandraRDD.scala:18
scala> println(rdd.map(_.getInt("value")).sum)
3.0
scala> :quit
As expected, we have 1 and 2 as values in our table and summing them within Spark Shell returns the result of 3.0.
Note: For curious readers that wonder where the Spark Cassandra Connector JAR files are stored, you can find out by typing the following:
$ find ~/.ivy2/ -iname "*cassandra-connector*"
/home/emre/.ivy2/jars/datastax_spark-cassandra-connector-2.0.0-M2-s_2.11.jar
/home/emre/.ivy2/cache/datastax/spark-cassandra-connector
/home/emre/.ivy2/cache/datastax/spark-cassandra-connector/jars/spark-cassandra-connector-2.0.0-M2-s_2.11.jar
Starting the Spark Thrift Server
Now that we have our Cassandra up and running, as well as having tested basic Spark connectivity via Spark Shell, it is time to start the Spark Thrift Server:
$ sbin/start-thriftserver.sh \
–hiveconf hive.server2.thrift.bind.host 127.0.0.1 \
–hiveconf hive.server2.thrift.port 10000 \
--jars /home/emre/.ivy2/jars/spark-cassandra-connector-2.0.0-M2-s_2.11.jar \
--driver-class-path /home/emre/.ivy2/jars/spark-cassandra-connector-2.0.0-M2-s_2.11.jar
Unless something went wrong, you should see lines similar to the following at the end of the log output of Thrift server:
...
17/01/16 11:04:11 INFO HiveThriftServer2: HiveThriftServer2 started
17/01/16 11:04:11 INFO ThriftCLIService: Starting ThriftBinaryCLIService on port 10000 with 5...500 worker thread
Testing Spark SQL Connectivity via Beeline Client
Now it is time to test Spark SQL connectivity to Cassandra using the Beeline client that is part of Apache Spark (extra vertical spaces added for clarity):
$ bin/beeline
Beeline version 1.2.1.spark2 by Apache Hive
beeline> !connect jdbc:hive2://localhost:10000
Connecting to jdbc:hive2://localhost:10000
Enter username for jdbc:hive2://localhost:10000: emre
Enter password for jdbc:hive2://localhost:10000:
log4j:WARN No appenders could be found for logger (org.apache.hive.jdbc.Utils).
log4j:WARN Please initialize the log4j system properly.
log4j:WARN See http://logging.apache.org/log4j/1.2/faq.html#noconfig for more info.
Connected to: Spark SQL (version 2.1.0)
Driver: Hive JDBC (version 1.2.1.spark2)
Transaction isolation: TRANSACTION_REPEATABLE_READ
0: jdbc:hive2://localhost:10000>
The username I used above is my Linux username, `emre`, and for password I simply hit ENTER; that is the default security setting, and we’re using the existing simple configuration of Cassandra, only to demonstrate the Tableau connectivity.
The next step is to create a table that reflects the contents of the Cassandra table:
0: jdbc:hive2://localhost:10000> CREATE TABLE bigindustries_simple_keyvalue_table using org.apache.spark.sql.cassandra OPTIONS (keyspace "bigindustries", table "simplekeyvaluetable");
+---------+--+
| Result |
+---------+--+
+---------+--+
No rows selected (1.9 seconds)
0: jdbc:hive2://localhost:10000> SELECT * FROM bigindustries_simple_keyvalue_table;
+-------+--------+--+
| key | value |
+-------+--------+--+
| key2 | 2 |
| key1 | 1 |
+-------+--------+--+
2 rows selected (3.331 seconds)
One final test, before starting Tableau, is to add some more data to Cassandra via CQLSH and check that they are immediately visible from within Beeline using Spark SQL:
Remember that we only had 2 key - value pairs (rows) in Cassandra, so let’s add a third one:
$ cqlsh
Connected to Test Cluster at 127.0.0.1:9042.
[cqlsh 5.0.1 | Cassandra 3.9 | CQL spec 3.4.2 | Native protocol v4]
Use HELP for help.
cqlsh> INSERT INTO BigIndustries.SimpleKeyValueTable(key, value) VALUES ('key3', 3);
cqlsh> SELECT * FROM BigIndustries.SimpleKeyValueTable;
key | value
------+-------
key1 | 1
key3 | 3
key2 | 2
(3 rows)
And in a different terminal window, let’s check the results of a similar query from our Beeline client:
0: jdbc:hive2://localhost:10000> SELECT * FROM bigindustries_simple_keyvalue_table;
+-------+--------+--+
| key | value |
+-------+--------+--+
| key3 | 3 |
| key2 | 2 |
| key1 | 1 |
+-------+--------+--+
3 rows selected (2.783 seconds)
Perfect! We are ready to proceed with connecting Tableau to Cassandra.
Tableau Connection to Cassandra via Spark SQL
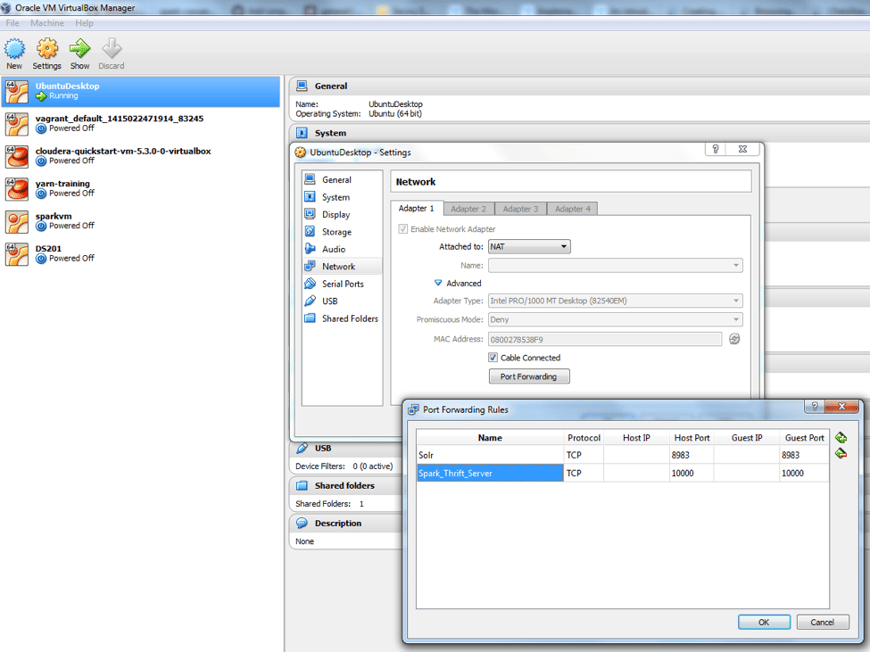
Assuming that you have already installed Tableau Desktop version 10.1 or higher on your MS Windows system, one important point to consider is to configure the required port forwarding on your virtual machine, that is making port 10000 inside your virtual machine visible to your MS Windows, so that Tableau running there can connect to it. This can be done as in the following screenshot:
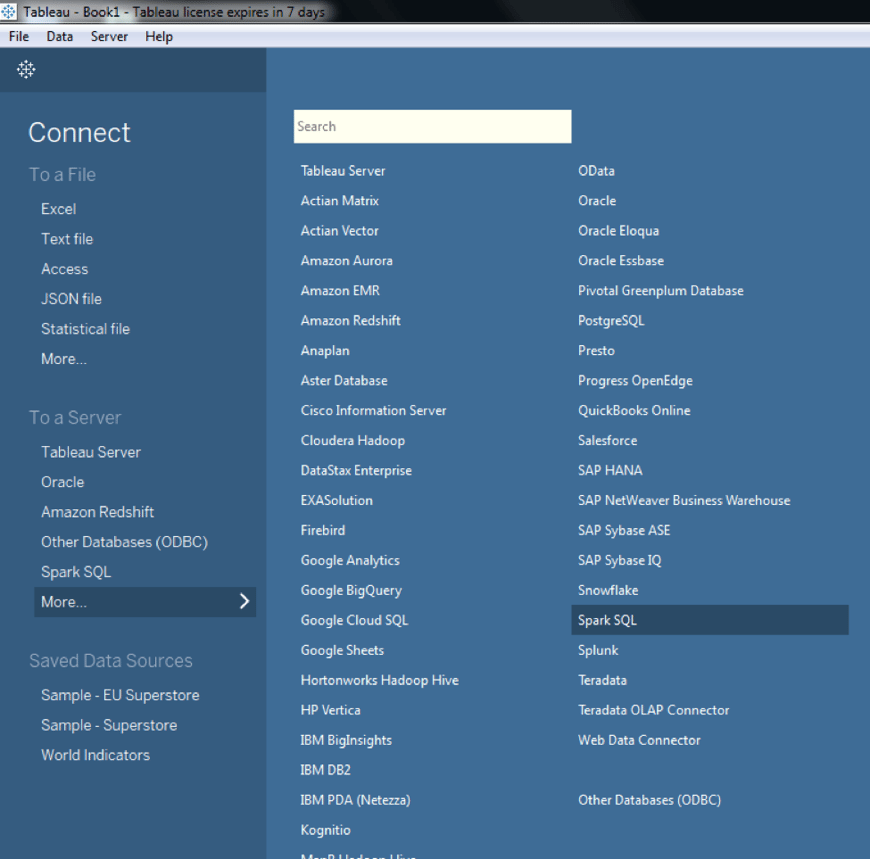
And now, you are ready to run your Tableau desktop, and select Spark SQL as the server to connect to:
In your first attempt, Tableau might require you to install the Spark SQL driver, and restart your system. In this case, Tableau will direct your web browser to https://www.tableau.com/support/drivers page, and there you can find “Spark SQL” driver. Please download and install the Spark SQL driver you’ll find on the Tableau Driver Download page, and let it restart your systems. After that, when you select Spark SQL, you’ll be presented with the following screen:
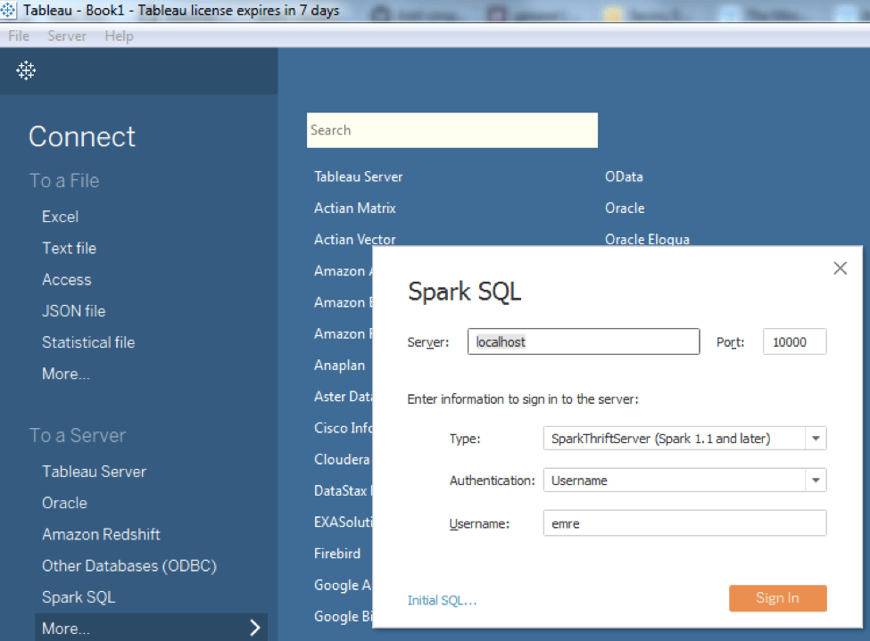
It is important that you select the localhost as the server, and don’t forget to make the type of connection to be “SparkThriftServer (Spark 1.1 and later)”. Also, the Authentication must be set as only “Username”, and then you can use your Linux username to “Sign In”. After you click on Sign In you’ll be presented with the following screen:
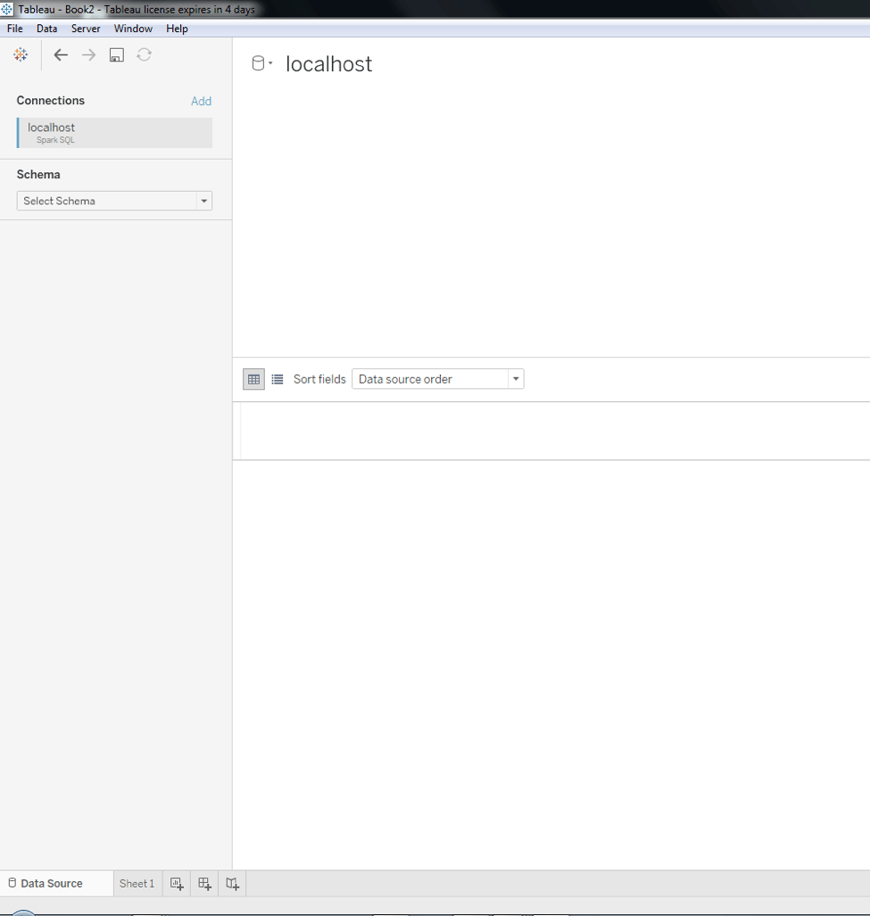
Tableau doesn’t show you any Schema, so you’ll have to click on the Search icon for schema, wait one or two seconds and then select the schema named “default”, as can be seen in the following screenshot:
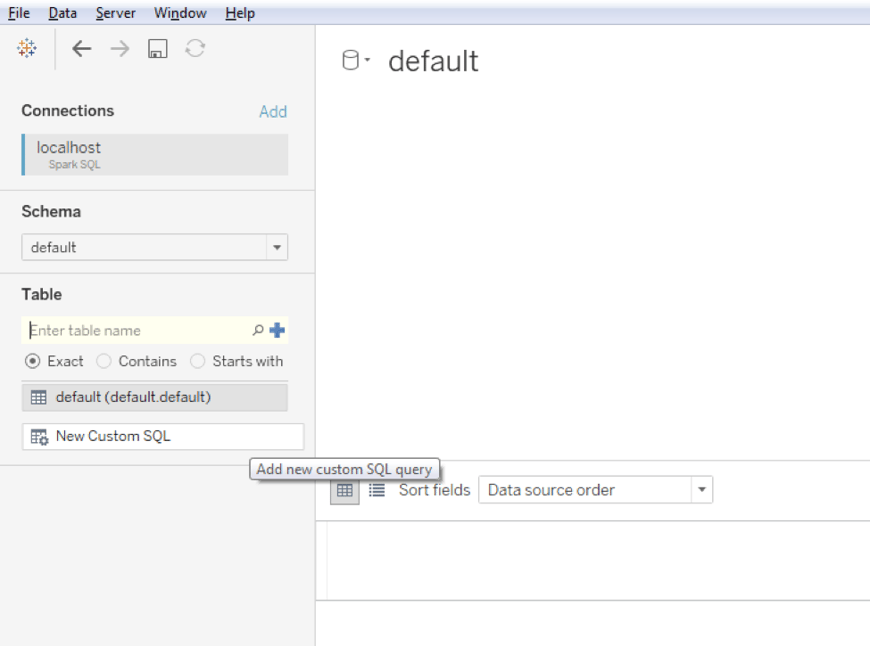
Now you’re ready to run some SQL queries against your Cassandra database, let’s try a very simple query to see the contents of our table, such as
SELECT * FROM bigindustries_simple_keyvalue_table
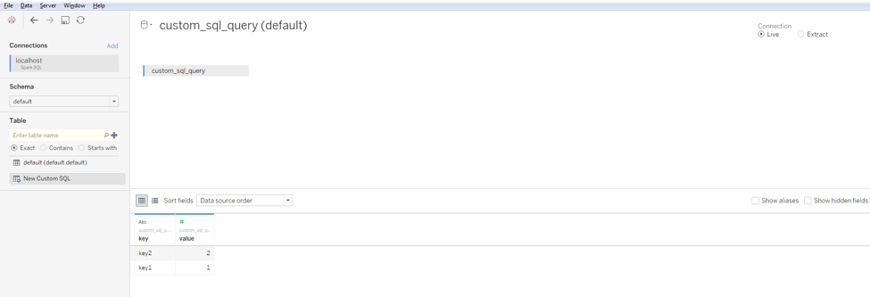
In order to run this query, select “New Custom SQL” on the left-hand side, and type the query into the newly opened window:
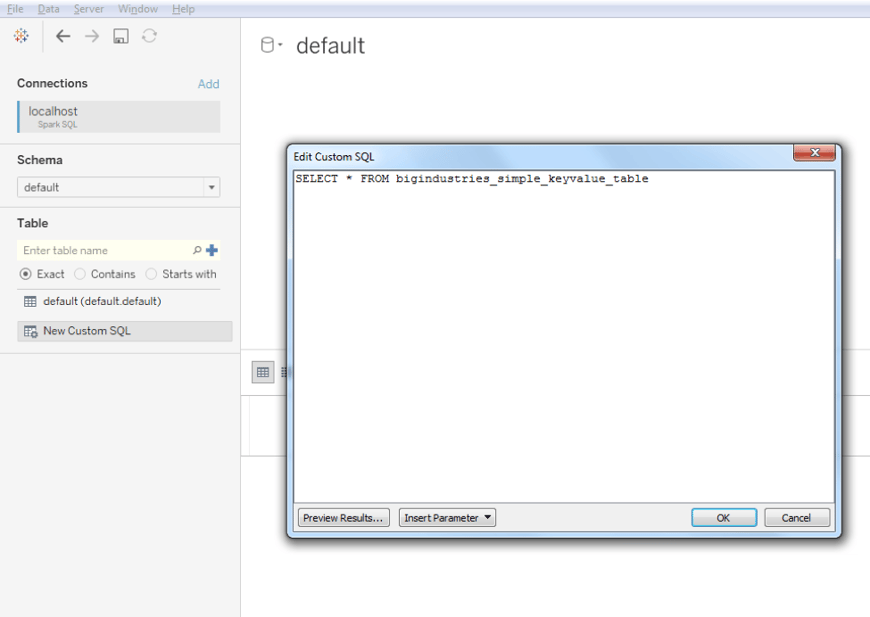
Once you click OK, Tableau will show you the following:
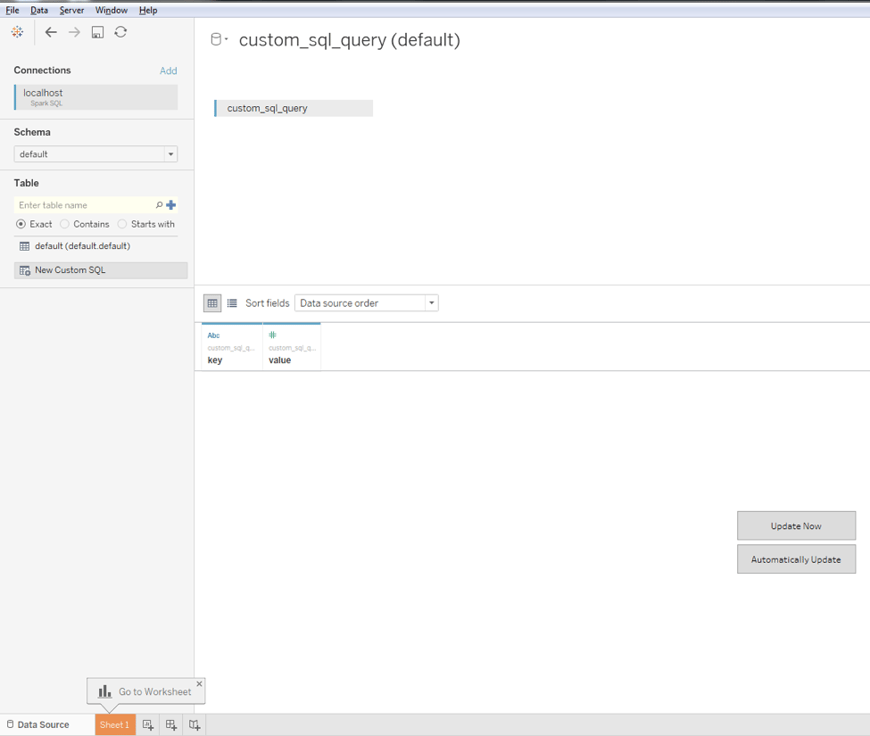
Finally, you are ready to click on “Update Now” button to see the results of your query: